How to change, remove or suspend a Plural user
Note that only Organization or Workspace Administrators have the ability to manage user access.
To turn on closed captions, click the "CC" icon towrads the bottom right of the video
Click here for a quick overview of permission levels in Plural >>
How to assign the Organization Administrator role
To assign or change a role for an existing Plural user, click on your initials in the top right corner of your screen, select “ORGANIZATION SETTINGS” and then go to the “MEMBERS” tab.


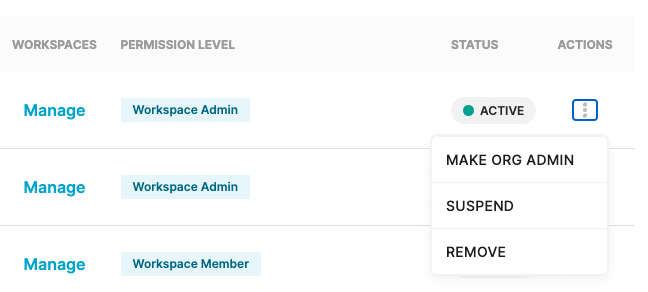
If you are an Organization Administrator, you can assign the role of Organization Administrator to additional team members by finding the team members name, navigating to the far right “ACTIONS” column and selecting “MAKE ORG ADMIN.”

How to assign the Workspace Administrator or Workspace Member role
As an Organization Administrator or a Workspace Administrator, you can assign the roles of “Workspace Administrator” or “Workspace Member” to others within your organization.
To assign a workspace-specific role, find the team members name, navigate to the “Workspace’s” column and select “MANAGE" on the column with the users name.

Organization Administrators can assign roles or remove Workspace access for any user within their organization.
Workspace Administrators can assign roles or remove workspace access for anyone who is currently a Workspace Member of any workspaces for which you are the Workspace Administrator.
Removing vs. Suspending a Workspace Member
Note: only Organization Administrators can suspend or remove users from an organization in Plural.
---
*IMPORTANT* If the user you're going to remove is the last/only person in a workspace, make sure that you add yourself to that workspace before you remove that user from Plural. If you remove the user from Plural before doing this you will lose access to that Workspace and any thing that was in it (tracked bills, saved search, notes, files, etc). Follow these steps to add yourself to a workspace.
---
Both suspending and removing a user from an organization prevents them from accessing any workspaces owned by that organization.
However, suspending a user from an organization preserves their workspace memberships; this means that if you reactivate that user’s account, they automatically rejoin any Workspace they were previously a part of.
Removing a user, on the other hand, does NOT preserve their Workspace memberships. The user would have to be manually re-invited to the organization and added to Workspaces again.
To remove or suspend a Plural user from your organization, click on your initials in the top right corner of Plural, select “ORGANIZATION SETTINGS” and then go to the “MEMBERS” tab.
Once in the “MEMBERS” tab, find the team member’s name, navigate to the far right “ACTIONS” column and select “SUSPEND” or “REMOVE.”

How to Remove Your Own Account
If you are a Workspace Member, contact your Workspace Administrator to have your account removed. You can find out who your Workspace Administrator is by going to the Workspace Detail page, and clicking the "MEMBERS" tab.

If you are a Workspace Administrator, you can request to have your account removed by another Workspace Administrator in your Workspace (if applicable) or your Organization Administrator. If you are the only Workspace Administrator and are unsure of who your Organization Administrator is, please contact us at support@pluralpolicy.com
---
*IMPORTANT* If you are the last/only person in a workspace, make sure that you add someone else to that workspace before you remove yourself from it. If you remove yourself from the workspace before doing this the organization will l lose access to that Workspace and any thing that was in it (tracked bills, saved search, notes, files, etc). Follow these steps to add a user to a workspace.
---
If you are an Organization Administrator, you can request to have your account removed by another Organization Administrator (if applicable). If you are the only Organization Administrator for your Plural account, you can request to have your account removed by emailing us at support@pluralpolicy.com.
Note: This feature is only available with a paid plan. Explore plan options >>